Vermont Energy Control Systems

Practical monitoring and control for the real world

Rule Programming | Vermont Energy Control Systems

Vermont Energy Control Systems

Practical monitoring and control for the real world

Rule Programming

Introduction

This document is a guide to programming the Vesta controller: the process of creating, testing, and fine-tuning the rules that determine Vesta behavior. Before using this document, make sure you're familiar with the terms defined in the terminology section of the user's manual.

Important: How to get the most out of this manual (and your Vesta)

PLAY! This is both simple and critical - people learn by doing. Don't just read this manual - play with the Vesta. It's delivered with a sample rule set that's described in the Front Panel Example section of this manual. Try editing rules, deleting rules, and adding new ones. Rename inputs or variables. Delete some. Create new ones. Edit rules to use different inputs or variables. You can't break anything. Mess up everything and try to get back to where you were. Restore the Front Panel example from backup (it's called ledSample).

Rules and Programming

Rule programming is virtually identical for all Vesta models. Differences will be noted where they occur.

Vesta behavior is determined by rules that are created through the user interface. In the simplest case, a rule sets an output (or a variable) to a value when one or more conditions are met.

Here's a screenshot of a sample rule set similar to what's shipped with the Vesta:

A screenshot of simple default rules

Figure 1.1: Sample Rule Set

In the example above there are 8 rules, two of which are simply comments (in blue) to improve readability. The first actual rule is this one:

Set LED1 to TRUE if User Switch Left is true and LED Enable is true

This is an example of a type of rule called a logical rule. This one sets the first front panel LED to true (on) if two conditions are met: User Switch Left must be true and LED Enable must be true. The green dot indicates that this rule is 'triggered' - both conditions have been met, and LED 1 will be on (unless some subsequent rule turns it off). The other icons at the left allow editing and manipulation of the rule.

Note: The 'triggered' indication dot is green on the Vantage and Pro, but red on the Classic.

This example is covered in detail in the Front Panel Example section of this manual.

Rule Types

The Vesta controller has several types of rules:

  1. Math Rules, which set a data element based on a mathematical operation
  2. Differential Rules, which act on a difference between two values
  3. Logical Rules, which act on true/false conditions
  4. Timer Rules, which create timers that can be used with other rules
  5. Schedule Rules, which cause actions to occur on a specified schedule
  6. PID Rules, which allow precise control using variable speed or power.

Each rule type will be described in detail in the following sections.

Rule Editing

Rules are based on templates and are constructed using pull-down selections. The rule editing screen looks like this:

A screenshot of the rule creation tool

Each of the pulldown menus contains only valid choices for the associated field. There is no way to create an invalid rule.

Rule Engine

Rules are evaluated by a periodic task called the rule engine. The rule engine typically runs through the rule set with a frequency of once every minute to as fast as ten times per second. In most applications, once per second is plenty.

Rule Programming | Vermont Energy Control Systems

Vermont Energy Control Systems

Practical monitoring and control for the real world

Key Concepts

In order to use rules effectively, there are a few key concepts that are important to understand. Don't worry about memorizing these, but refer to this section if you get stuck or have unexpected behavior.

Rules set elements

Important Concept: Every rule has a 'target' data element whose value it may set. Only outputs and variables can be set.

Different rule types have different behaviors. There are discussed in more detail in the following sections. In summary:

  • Math rules always set their target element every cycle.
  • Every differential rule sets its target element to either TRUE or FALSE every cycle.
  • Logical rules ONLY change their target if the rule evaluates to true. If the rule evaluates to false, they do nothing.
  • Timer rules set their target if the criteria are met. If not, they decrement their target until the target is zero.

Rules can use either numeric values or elements as parameters

Important Concept: Some fields in some rules can refer to a data element OR may simply have a numeric value. This provides flexibility: If the parameter is something that you might want to set via another rule or from the user interface, use a variable. If it's a simple value that's unlikely to change, just use the numeric value, For example, consider a rule that determines whether a zone needs heat. It could compare the current temperature to a fixed numeric value (68 in this case).

Set Zone 1 Demand if Room Temperature is less than 68.0 with a deadband of 1.0

However, the same rule could refer to a variable instead - 'Room Setpoint', for instance. The value of the Room Setpoint variable could then be set by other rules or could be set from the standard or a custom user interface:

Set Zone 1 Demand if Room Temperature is less than Room Setpoint with a deadband of 1.0

Rules are evaluated periodically

The task that handles rules runs at a set interval (usually once per second). Every rule is processed, results are sent to Vesta outputs, and the task waits until it's time to run again.

Rules are evaluated sequentially

Rules are evaluated in the sequence displayed. Results are not written to shared memory until all rules have been evaluated. This means that if you have two or more rules that set the same element, the last value is the one that will be written back to shared memory.

In the Front Panel Example, there is an instance of this situation. When the user switch is moved to the 'right' position, LED 3 lights immediately. However, LED 4 does not light until the next cycle. That's because LED 4 is based on the LED Timer variable, and that does not get set until the end of the first cycle.

Default values for elements

Discrete outputs and state variables are a special case

At the beginning of each rule cycle, all discrete outputs and state variables managed by the rule engine are assumed to be FALSE. The final value after the rules are evaluated will be FALSE unless a rule sets them to TRUE. One consequence of this behavior is that if a Vesta output is active, there is a rule that's triggered to make that happen. This makes it easy to answer the question "Why is this device on?"

All other elements inherit their previous values. If no rule acts on them, they will retain the same value indefinitely.

Multiple rules for the same element

Any element affected by multiple rules ends with the value from the last rule that sets it. Note that logical rules only set their target element when triggered and leave them unchanged otherwise. This is covered in more detail in the Logical Rules section.

It's possible and often desirable to have more than one rule that sets the same element. This is particularly true for discrete output elements. If there are multiple rules that set the same element to TRUE, then it will end up as TRUE if any of the rules is triggered.

Deleting, moving and editing rules

Any rule may be deleted by simply clicking the 'X' button next to the rule. There is no 'undo'.

You can move rules up or down by clicking the arrow buttons next to the rules.

To update a rule, click the pencil icon next to the rule. This will open the rule in a new window (or tab):

A screenshot of the rule editor

You can construct your rule by selecting values from the pulldown menus. In each case, the pulldown will only display choices that are valid for that field. For instance, you can't set the value of an input, so sensors are not shown as choices for the 'target' field.

Note that the pulldown menu choices follow the Vesta color coding standard:

Analog Inputs (sensors)
Analog Outputs
Discrete Inputs
Discrete Outputs
Variables

If there's a field that can have either a numeric value or an element reference, there will be a pulldown with a text entry box below it. If the pulldown is set to '--' then the value in the text box will be used.

Rule Programming | Vermont Energy Control Systems

Vermont Energy Control Systems

Practical monitoring and control for the real world

Data Elements

In the Vesta system, 'Data Element' refers to any input, output, or variable that can be displayed, datalogged, or used in a rule. Almost all interaction with the system is through Data Elements. A Data Element has a user-defined name and may represent either a physical input, a physical output, or a variable.

One important difference between the Vantage/Pro and the Classic: Where the Classic one tab for managing data elements ('Data Elements') and another for rules, these tabs have been combined into a single tab ('Elements & Rules') on the Vantage and Pro.

A screenshot of the home page with a variety of data elements

Figure 3.1: Home Page showing a variety of Data Elements

IMPORTANT CONCEPT: Vesta rules can act only on data elements. There are only two types of data elements:

  1. Physical inputs and outputs. These allow the rules to act on and control the outside world.
  2. Variables. These contain numeric or logical values that can be used as part of any rule.

You can always see which physical channels are assigned to specific data elements - just click on the 'Configure I/O' tab ('Physical I/O' tab on the Classic).

Creating Data Elements

Data elements representing physical I/O are created using the 'Configure I/O' tab ('Physical I/O' tab on the Classic).

Data elements representing variables are created on the 'Elements & Rules' tab ('Data Elements' tab on the Classic).

The Vesta controller is programmed by creating rules that act on Data Elements. Rules cannot be created until the associated data elements exist.

One of the first tasks in setting up an Vesta system is to give each physical I/O channel a data element with a name that describes its function such as 'Wood Boiler Outlet Temp' or 'Second Floor Heat Demand'. This is covered in the user's manual, and is typically part of initial system setup.

Once data elements for physical I/O have been created, the next task is to create data elements for any variables that will be needed.

All available data elements are displayed on the 'Elements & Rules' tab ('Data Elements' tab on the Classic).

This tab allows the name of any data element to be changed. It allows the creation of new variables as well as setting the value for any variable.

Variables

There are three types of variables:

  1. Standard variables
  2. State variables
  3. Timer variables

Standard Variables

Standard (analog) variables are data elements that contain numeric values. They can get their values from the user interface, or can be set by rules. Values are stored as floating point numbers, but any variable can also be treated as a boolean (true/false) value.

State Variables

State variables are a special class of variable. State variables are treated as boolean values. If they are managed by the rule engine, they are automatically set to 'false' and will remain false unless a rule sets them to true. In the Classic, any variable with a tilde (~) as the first character in the name will be treated as a state variable.

Timer Variables

A timer variable is a standard variable that is named as the target of a timer rule. These variables will be decremented automatically by the rule engine. Their value at any time is the number of seconds remaining before they reach zero. See the section on timer rules for more details.

Variables as True/False Values

In the Vesta, any non-zero value is considered 'true'. For example, a variable used as a timer will have a numeric value representing the number of seconds remaining. If that value is non-zero, then the timer is 'true'. There are also predefined elements named TRUE and FALSE with values of 1 and 0.

The value of any variable may be set or changed via a rule, it may remain constant for all time, or it may be changed via the web interface.

Variables can be created as needed, and their values may be changed at any time via the web interface. All changes take effect immediately.

Creating Variables

To create a variable, enter the name and numeric value in the corresponding boxes on the Elements & Rules (or Data Elements) tab, and click the 'Create' button.

The view shown above contains the elements set up at initial delivery, These support the 'Front Panel' example that will be discussed in the next section.

Rule Programming | Vermont Energy Control Systems

Vermont Energy Control Systems

Practical monitoring and control for the real world

Front Panel Example

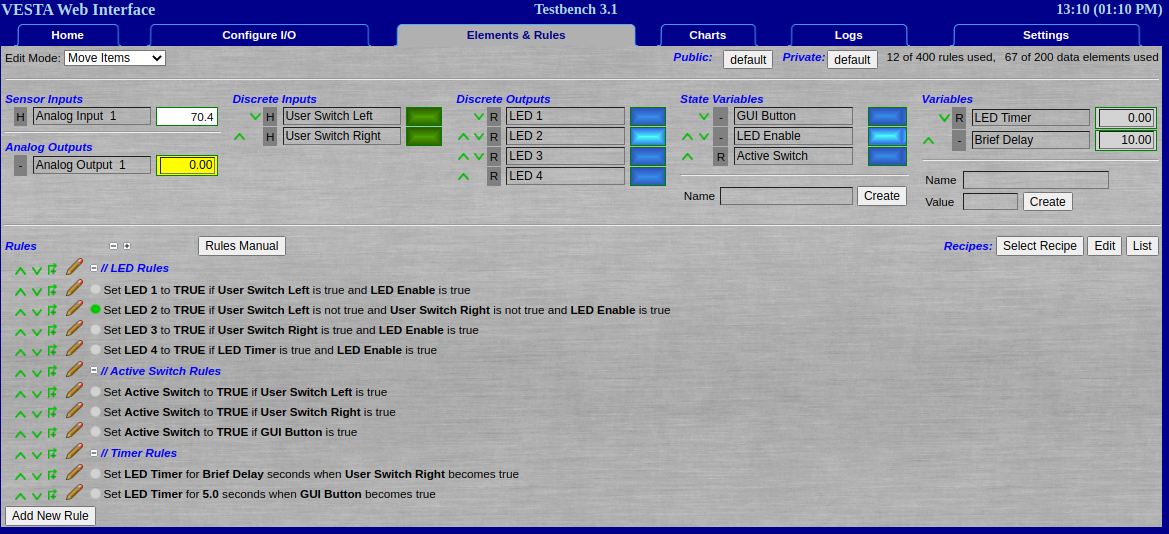
The Vesta is delivered with a simple set of rules that use the user-assignable three position switch and LEDs on the controller front cover. This example does not require any external hardware to be connected. Turn on your controller and connect to it to follow the discussion in this section. This configuration and rule set is backed up as 'LedSample' on the Vesta. Some older Classics have a slightly different LED front panel example, but the concepts are the same.

Each rule type will be covered in detail in the following sections. This section is intended as a quick introduction to rules.

A screenshot of the Front Panel Example

Figure 4.1: Front Panel Example

On the Vantage and Pro, this page is interactive. Data element values and rule status indicators are updated continuously. Discrete outputs and state variables can be toggled on/off by clicking on the blue rectangular status lights.

The top portion of the screen shows all of the data elements that are available on the system. Below that, the rules are listed in the order that they will be evaluated.

Comments are in blue and preceded by '//'. In this example, comments break the rules into three sections.

Rules can be rearranged. The icons next to each rule allow the following actions:

  • Delete the rule
  • Move the rule up
  • Move the rule down
  • Insert a new rule above the rule
  • Edit the rule

There's also an indicator next to each rule that shows whether the rule is currently (on the Classic, as of the last refresh) 'active'. In the example above, only one rule is active.

Desired Behavior

For the purposes of this example, we'll make use of the following data elements:

Name Type Description
LED 1 Discrete Output Front Panel LED
LED 2 Discrete Output Front Panel LED
LED 3 Discrete Output Front Panel LED
LED 4 Discrete Output Front Panel LED
User Switch Left Discrete Input True if user switch is in the left position
User Switch Right Discrete Input True if user switch is in the right position
LED Enable State Variable Not connected: Set via GUI
GUI Button State Variable Allows user to turn on LED from GUI
Active Switch State Variable Indicates that at least one switch is 'on'
Brief Delay Variable Holds delay value for LED timer
LED Timer Variable Used for illuminating LED 4

The desired behavior is as follows:

  1. Illuminate LEDs only when the LED Enable button is pressed
  2. If the user switch is in the 'left' position, illuminate LED 1
  3. If the user switch is in the middle position (neither left nor right) illuminate LED 2
  4. If the user switch is in the 'right' position, illuminate LED 3
  5. When the user switch is moved to the 'right' position, illuminate LED 4 for a period determined by the value of the 'Brief Delay' variable
  6. When the GUI Button is pressed, illuminate LED 4 for 5 seconds
  7. If the user switch is in either the right or left positions, or if 'GUI Button' is pressed, set 'Active Switch' to TRUE

These desired behaviors are of course completely arbitrary and have been developed for the purposes of illustration only. On the Vantage and Pro, the LED Enabled and GUI Button buttons can be clicked on and off on the Elements & Rules tab. For the Classic, the buttons can be clicked on and off via the GUI tab which is described here.

Rules for LED Control

The first three rules in the LED control section implement the first three desired behaviors:

A screenshot of rules for LEDs

The rules are almost an exact restatement of the desired behaviors. Note that all rules are in the general form "Set (some element) to (some value) under (some condition)". Remember that TRUE and FALSE are predefined variables.

The fourth rule implements the fourth desired behavior based on a timer. The timer rules are in the third section and will be discussed there.

Rules for the 'Active Switch' state variable

Screenshot of rules for the Active Switch

These three rules serve to set the 'Active Switch' state variable to true if the user switch is left or right, or if the GUI Button is true. Since it's a state variable, it will have a value of false if none of these rules set it to true.

Timer Rules

Screenshot of rules for the LED Timer

There are two timer rules:

  1. Any time the switch is moved to the 'right' position, set LED Timer for the number of seconds represented by the 'Brief Delay' variable - 10 seconds in this case
  2. Any time the GUI Button becomes true, set LED Timer for 5 seconds

Note that one rule uses a variable to determine the timer delay, while the other uses a plain numeric value. When LED Timer is set, it will immediately begin counting down. As long as it is non-zero, LED 4 will be turned on based on the fourth rule in the LED section above.

Front Panel Uses

Once you're done using the front panel to learn about programming, it still has a few uses:

  1. Testbed for new rules. Rather than testing a new set of rules on actual hardware, create the rules exactly as they will be except have them turn on LEDs rather than actual pumps and valves. If the rules aren't doing exactly what you want, no harm done.
  2. Substitute input for testing. If you have a rule that's triggered by something that's not well suited for testing - an over temperature switch, for instance - you can test the rule using the front panel switch as the input. Simply update the rule to use the actual input once you're satisfied.
  3. User input and / or status displays. In some cases there may be a need for user input or a desire to provide visual status indication. Simply label the switch and/or LEDs as needed and build rules. For example, you might use the LEDs to indicate important operating modes. You might use the front panel switch to allow the user to set a particular condition - Summer vs. Winter, or Manual / Automatic / Off.

Rule Programming | Vermont Energy Control Systems

Vermont Energy Control Systems

Practical monitoring and control for the real world

Math Rules

Math rules set an element to the result of a mathematical operation performed on two values, each of which may be an element or a numeric value. The possible mathematical operations are addition, subtraction, multiplication, and division. The template is as follows: Set Element1 to Element/Value (+-*/) Element/Value

Math rules are always active - they set their target element on every cycle. A typical math rule might calculate the difference between two values: Set Boiler Rise to Wood Out minus Wood In

Rule Programming | Vermont Energy Control Systems

Vermont Energy Control Systems

Practical monitoring and control for the real world

Differential Rules

Differential rules set an element based on the difference between two other elements. The target and the value being tested must be elements - the other parameters can be either elements or numeric values. The template is as folllows:

Set Element1 (to TRUE) if Element2 is at least Element/Value greater (or less) than Element/Value with a deadband of Element/Value

NOTE: Differential rules have an implied 'to TRUE' as part of the template. If the conditions in a differential rule are satisfied, the target element will be set to TRUE.

NOTE 2: Differential rules ALWAYS set the value of the target variable. It's set to TRUE if the rule criteria are met, and FALSE if not.

The differential rules have a lot of options and a lot of resulting complexity. There are five parameters involved, and four of them are required.

Example: Solar Circulator

A differential rule might be used to control a solar panel circulator, for instance. In that case, we might want the circulator to be on any time the panel temperature is at least 5 degrees above the storage tank temperature. The rule might look like this:

Set SolarCirc if PanelTemp is at least 5.0 greater than StorageTemp with a deadband of 2.0

In this example, these elements are used:

  1. SolarCirc: A discrete output that turns on the solar panel circulator
  2. PanelTemp: A sensor input that reads the panel outlet temperature
  3. StorageTemp: A sensor input that reads the storage tank temperature

The first element is the target. It is set to TRUE (a numeric value of 1) if the rule is triggered. In most cases, the target element will be a discrete output that controls a pump or a valve. In our example, it's SolarCirc.

The second element is the first of two values to be compared. It will typically be either a sensor value or a variable. In our example it's PanelTemp.

The third element is the differential. In our example it's the numeric value 5.0. This element is optional. If omitted, it assumes a value of zero, and the displayed rule will not show this element.

The fourth element is the second value that's part of the comparison. In the example, it's the storage tank temperature. It could also be a variable.

The fifth element is deadband (sometimes called hysteresis). This helps prevent excessive cycling. A more detailed discussion of deadband can be found below.

Example: Thermostat

A fairly common need is to implement a rule that has the same effect as a thermostat. For instance, we might want to open Zone Valve 1 if the top floor temperature is below the top floor setpoint. In this case, we don't need the third term so it's omitted. The rule will be displayed without the differential term.

Here's the rule:

Set ZoneValve1 if TopFloorTemp is less than TopFloorSetpoint with a deadband of 2.0/span>

In this example, these elements are used:

  1. ZoneValve1: A discrete output that opens the top floor zone valve.
  2. TopFloorTemp: A sensor input that reads the top floor temperature
  3. TopFloorSetpoint: A variable that contains the desired temperature for the top floor.

Deadband is a value that's added (or subtracted) from the temperature difference depending on whether the target element is active or not. It has the effect of preventing short cycling.

If you had a rule that turned on a circulator whenever a measured temperature was less than 70 degrees, you might have a situation where the temperature was near 70 degrees, but fluctuating between 69.9 and 70. Without deadband, the circulator would cycle on and off with every fluctuation.

With that same rule and a two degree deadband, the system will subtract two degrees from the setpoint whenever the circulator is off. That means that when the temperature hits 70, the circulator turns off. It will stay off until the temperature hits 68 degrees.

In this way, the temperature will cycle between 68 and 70. The value of deadband can be changed to tune system performance.

For rules with a 'less than' term such as our thermostat example, deadband is subtracted from the fourth element (setpoint in this case). For rules with a 'greater than' term, the deadband is added.

Rule Programming | Vermont Energy Control Systems

Vermont Energy Control Systems

Practical monitoring and control for the real world

Logical Rules

Logical rules operate on TRUE/FALSE values. They set an element based on whether some combination of other elements are TRUE or FALSE. The template is as follows:

Set Element1 to Element/Value if Element2 is / is not true and Element3 is / is not true and Element4 is / is not true

NOTE: Unlike differential rules, logical rules can set the target element to any value, not just TRUE. If the conditions in a logical rule are satisfied, the target element (Element1) will be set to the value of the element or number specified in the second parameter.

NOTE: Also unlike differential rules, a logical rule does not set the value of the target element if conditions of the rule are not satisfied. If the rule is not triggered, then the target element remains unchanged.

In logical rules, the last two elements are optional.

The LED Sample rules that are delivered with the Vesta are described in an earlier section. These provide good examples of logical rules.

Multiple Rules and Logical OR

Individual logical rules can contain multiple criteria which are combined with a logical AND. Sometime it's desirable to combine criteria with a logical OR. For instance, suppose that you have a set of discrete inputs connected to switches that detect dangerous conditions and you want to turn on an alarm if any of them are true. A single logical rule can't do this. However, you can create a set of rules all with the same target element as follows:

Set Alarm to TRUE if FloorWet is true

Set Alarm to TRUE if OverTemp is true

Set Alarm to TRUE if DoorOpen is true and PrimaryBlower is true

Since logical rules do not set their target element if they're not triggered, multiple logical rules can act on the same target with the result that the target is set if any of the rules are triggered. Remember that discrete outputs and state variables default to FALSE if no rule acts on them. In this case, Alarm is a discrete output so it will end up with a value of false if none of these rules are triggered.

Example: Setback Rule

In the LED example, all of the logical rules set the target element to TRUE. This is the most common situation, and it makes perfect sense if the target element is a discrete output. However, the target could also be a variable or an analog output. In the differential rules section there was an example of a differential rule that provided the same functionality as a thermostat:

Set ZoneValve1 if TopFloorTemp is less than TopFloorSetpoint with a deadband of 2.0

If there were a discrete input (a switch, or timer contacts, or an occupancy sensor) that indicated whether the heated area were occupied, we could add a couple of logical rules to change the TopFloorSetpoint variable:

Set TopFloorSetpoint to 72 if Occupied is true

Set TopFloorSetpoint to 65 if Occupied is not true

In this example, these elements are used:

  1. TopFloorSetpoint: A variable that contains the desired temperature for the top floor
  2. Occupied: A discrete input that indicates whether the area is occupied

Rule Programming | Vermont Energy Control Systems

Vermont Energy Control Systems

Practical monitoring and control for the real world

Timer Rules

Timer rules set a variable to a value (in seconds) when the specified condition is met. The target variable will automatically count down each cycle. The template is as folllows:

Set Element1 for Element/Value seconds when Element2 (is / becomes) (true / false)

Element1 must be a variable. It is given the value of the second parameter (element or value) when the specified conditions are met. Element1 should not be used as the target of any other rule. Variables that are the target of timer rules are decremented every cycle of the control process until they reach zero.

BECOMES vs. IS

In timer rules, the rule can be triggered when a specified variable IS true (or false), or when it BECOMES true (or false). This creates two very different behaviors.

IS

If the rule uses IS as the criteria, then the timer will be reset to the specified value every cycle that the chosen element has the specified value. This is useful if you want to time from the end of a condition. For instance, you might want to keep track of whether the wood boiler could still produce heat. Simply measuring output temperature isn't adequate, since it will fluctuate over time. A reasonable rule might be to consider that the wood boiler is out of fuel if its outlet temperature stays below 160 degrees for 30 minutes. This requires a set of rules, one of which is a timer rule. The first rule we need is a rule to determine whether the wood boiler is hot. We'll create a differential rule:

Set WoodBoilerHot if WoodBoilerOutlet is greater than WoodBoilerMinimum with a deadband of 2.0

This sets a variable (WoodBoilerHot) that tells us whether the wood boiler is hot or not. Now we can set a timer based on the wood boiler outlet being hot:

Set WoodHeatTimer for 1800.0 seconds when WoodBoilerHot is true

As soon as the wood boiler outlet temperature exceeds WoodBoilerMinimum, the first rule sets WoodBoilerHot to true. It will stay true as long as the wood boiler outlet is hot enough, although it may not be true for a few minutes now and then if a slug of cold water is introduced from an inactive zone.

As soon as WoodBoilerHot is true, WoodHeatTimer gets set to 1800 seconds. It will keep getting set to 1800 seconds every cycle as long as WoodBoilerHot remains true. As soon as WoodBoilerHot is no longer true, WoodHeatTimer will start to count down, reaching zero if WoodBoilerHot remains false for 1800 consecutive seconds.

BECOMES

The other behavior for timer rules is BECOMES. In this case, the timer is set when the specified element makes a transition to the specified value. It then counts down, only resetting if the element makes another transition to the specified value. Consider an example where you want to do something different during the time that the boiler is first coming up to temperature. A thermocouple in the flue could detect a rise in flue temperature and trigger a timer:

Set FlueHot if FlueTemperature is at least 0.0 more than 150 with a deadband of 10.0

This tells us that the flue is hot enough to indicate that a fire has been started (or is in progress).

Set FireStartTimer for 600 seconds when FlueHot becomes true

The FireStartTimer will be set as soon as the flue temp climbs above the threshold. It will then count down regardless of whether the temp stays above the threshold or drops below again. The only way it would be reset is if the temp drops below the threshold and then rises again.

Rule Programming | Vermont Energy Control Systems

Vermont Energy Control Systems

Practical monitoring and control for the real world

Schedule Rules

Schedule rules set a variable or output to a selected value on a defined schedule for a period of time when a specified condition is met. For instance:

Set Coffee Maker to TRUE in month(s) [JFMAM---SOND] day(s) [-MTWTF-] at hours(s) [------6-----------------] and [15] minutes

for 45 minutes when Vacation is not true

NOTE: A schedule rule includes the length of time that the rule will be active when triggered. It's more comprehensive than "Turn outside lights on at 10:00". Instead, it's "Turn outside lights on at 10:00 for 8 hours".

Variable Or Output

Schedule rules can set any variable (analog or state variable) or any output (analog or discrete). This example rule is setting a discrete output that turns on the coffee maker.

Selected Value

Schedule rules set the chosen output or variable to a value - in this case TRUE.

Schedule

This term is the most complex. You can specify 'all months' or you may choose individual months.

In the same way, you can specify all days of the month, specific days of the month, or specific days of the week.

Finally, you can select every hour or specific hours, and you can select one or more minutes during the hour. The selected hours are shown in condensed form in a bracketed list with 24 positions starting at Midnight. Midnight and Noon are shown as 'M' and 'N'. 10:00 and 11:00 are shown as 'T' and 'E'. The example below shows a rule that's triggered at Midnight, 8:00AM, 10:00AM, Noon, and 5:00PM.

[M-------8-T-N----5------]

In this example, the rule will trigger in January through May and September through December. During those months it will trigger on weekdays (MTWTF, Monday through Friday). On the days when it triggers, it will do so at 6:15.

Period of Time

Schedule rules always set the selected variable or output for a period of time - in this case 45 minutes. the period is a numeric value, and the units can be minutes, hours, days, weeks, or months. If months are chosen, the actual period is calculated as months times 30 days.

Specified Condition

Finally, schedule rules are active only when a specified condition is met. In this case, there's a state variable called vacation, and the rule is only active when vacation is not true.

Rule Programming | Vermont Energy Control Systems

Vermont Energy Control Systems

Practical monitoring and control for the real world

PID Rules

PID rules allow the controller to continuously vary the speed or position of a controlled device in order to achieve a target condition. PID is a commonly used control scheme in industrial settings. The theory is beyong the scope of this document, but this is one of many good references available on the web.

Use of PID rules in the Vesta assumes that you have a motor, circulator, fan, blower, or other device that is connected to a VS-1108 Variable Speed Control Unit or some other device that can be controlled directly using the 4-20ma analog outputs on the Vesta.

Line 1 - Rule Setup

PID rules have three lines. The first line sets up the rule itself - what is to be controlled, what the goal is, and when the rule should operate. There are five fields in this line. All are required, and all must refer to Vesta data elements. This rule is from the included Demo application. It varies the current through a light bulb to keep the shade temperature at a target value:

Control Light Bulb to make Shade Temp close to Shade Target based on Room Temp when ~PID Enabled is true

The fields are as follows:

  1. Control Output - 'Light Bulb' in this example. This must refer to a Vesta analog output.
  2. Process Variable - 'Shade Temp' in this example. This is the parameter that you wish to affect and bring as close as possible to a desired target value. It almost certainly needs to be a sensor input, although it could be a variable whose value is calculated from sensor inputs. For example, you could calculate temperature rise through a heat exchanger as the difference between inlet and outlet temperatures. A PID rule could then vary fan or circulator speed to maintain a constant temperature rise.
  3. Target Value - 'Shade Target' in the example. This can be a variable or an analog input. In eiter case, the purpose of the PID rule is to vary the control output to drive the process variable as close as possible to this value.
  4. Bias Input - 'Room Temp' in the example. This is used to predict an initial value for control output. It is discussed in more detail below.
  5. Control Input - '~PID Enabled' in the example. If this data element is true, then the PID rule will be active. If it is not true, then the PID rule will not manage the control output, except that it will set the output to zero when the control input first becomes false.

Line 2 - Tuning Parameters

The second line contains tuning parameters. All are required, and all are directly entered numeric values:

gain = 5.0 damping = 20.0 lmin = 100.0 lmax = 40.0

Gain

Gain is the simplest tuning parameter. The technical term is proportional gain, and it's the 'P' in PID. It controls how strongly the PID rule responds to errors - that is, differences between the value of the process variable and the target value. The control output is in percent and has a maximum possible range of 0 to 100. The PID engine will compute an expected value for the control output and then add a correction that is the gain multiplied by the error as defined above.

For example, assume that the expected control output is 50%, but the shade temperature is 5 degrees cooler that the target temperature (an error of 5 degrees). With a gain of 5, that would result in a correction of 25 to be added to the expected output of 50, yielding an output of 75.

Start with a relatively low value for gain. Too high a value will cause large fluctuations as the system over-reacts to small errors.

Damping

Proportional gain alone is usually not enough to bring the process variable to the target value. PID controls also contain a factor that looks back to see whether there's been a persistent error over time. It calculates an additional correction based on how long an error has existed and how large that error has been. Mathematically, this technique is called integration, and contributes the 'I' in PID.

In the Vesta PID engine, the damping term controls the effect of the integral factor. A large damping value supresses the effect of the integral factor.

Start with a relatively high value for integral damping - 100 to 1000 or more, especially if there's a large time lag between changes in the control output and resulting changes in the process variable. Once a reasonable value for gain has been established, reduce damping in 50% steps until the system starts to over-react, then go back to the last stable value.

Bias - lmin and lmax

It is helpful to enable the system to make a reasonable estimate of the required control output. In many cases, there's some environmental value that can be used to make an approximate guess. For instance, outdoor temperature might allow an estimate of required radiant floor supply temperature - higher when it's colder outside. In the Vesta PID rule, the bias value is used with lmin and lmax to calculate the estimated control output. The bias value element would be outdoor temperature in the radiant floor example. In our light bulb example it's room temperature, since we expect that room temperature can predict how hot our bulb will need to be to achieve a given shade temperature. If our shade temperature target is 140 degrees and the room temperature is also 140, then the control output would be 0 - no additional heat would be needed. The lmin parameter is the bias value at which the control output would be expected to be at it's minimum.

By the same token, lmax is the bias value at which the system would need maximum control output. We don't really know what that is for our light bulb, but we'll guess that at a room temperature of 0 degrees, it would need 100% output.

Note that it's not critical to have an exact value. As long as the estimate is better than an arbitrary fixed value, it will improve performance.

If there is no value that can be used to predict the control output, set lmin and lmax to 0. In that case, the Vesta will use 50% as a starting value for control output.

Min and Max Output

In some cases, you may want to set a minimum and/or maximum value for the control output. In most cases, 0 and 100 are appropriate.

Line 3 - Purge Logic

Line 3 is used if there's a need for purge cycles. This is often the case when controlling the draft blower on a wood gasification boiler. When running at low speed, it's necessary to periodically flush the primary chamber by running the blower briefly at high speed. This technique can also be used if low speed allows air bubbles to accumulate, or if there's any other reason to have brief periodic high speed intervals.

Purge values are required. Set them to 0 if purge is not desired.

Min Output = 0.0 Max Output = 100.0 Purge Threshold = 0.0 Purge cycle interval = 0.0 Purge duration = 0.0

Purge Threshold sets the value for control output below which purges are required. A value of 50 means that the system will run purge cycles any time the output is below 50%.

Purge cycle interval is the time in seconds between purges.

Purge duration is the duration in seconds for the purge cycle. The output will be set to 'Max Output' value for this duration each purge cycle.

Rule Programming | Vermont Energy Control Systems

Vermont Energy Control Systems

Practical monitoring and control for the real world

Comments

Comments are technically rules, but they don't perform any action. They can be moved up, moved down, deleted, and edited just like any other rule. Comments can be up to 80 characters in length. They are displayed in C++ style with two leading slashes:

//Boiler State Variables

Use comments to break your rules up into logical groups. This will greatly improve readability and make it easier to understand your rules in the future.

Rule Programming | Vermont Energy Control Systems

Vermont Energy Control Systems

Practical monitoring and control for the real world

Style

The Vesta controller provides a limited set of choices for programming. Sometimes, it may take several rules to accomplish a simple task. However, there are techniques that can reduce the number of rules and make system behavior easier to understand.

Tip #1: Use discrete outputs or state variables to hold true / false information

Very often there will be rules which result in a true / false value which will be used by subsequent rules. For instance, there might be a rule that determines that the outlet of the wood boiler is hot enough to be useful. Create a state variable named WoodBoilerHot and set it using a differential rule something like this:

Set WoodBoilerHot if WoodBoilerOutlet is greater than 160 with a deadband of 5.0

Using a discrete output rather than a state variable accomplishes the same thing, with an added benefit: the output can be connected to an LED such as one of the existing LEDs on the controller front panel. In this way, the value is visible. In this example, we could rename LED 1 on the front panel to WoodBoilerHot and put a label on the front panel. The status of the wood boiler would then be visible at a glance.

Tip #2: Think about important system states

Chances are that there are many system states, conditions, or modes that are important in defining or describing system operation. In programming, it helps to create state variables or use discrete outputs (see above) to carry information about those system states.

For instance, one very common and important question is whether there is any heat demand. There may be many rules which depend on the question of whether any zone is calling for heat. For example, there might be a circulator that needs to run if any zone needs heat. With three zones and no system state logic, the rule set might look something like this:

Set PrimaryCirculator to TRUE if ZoneTstat1 is true

Set PrimaryCirculator to TRUE if ZoneTstat2 is true

Set PrimaryCirculator to TRUE if ZoneTstat3 is true

That's not too bad, but the rules do look a bit repetitive. The situation becomes much worse if the circulator is only supposed to run if there is heat available form the wood boiler or heat storage. Assuming an aquastat on the boiler and storage tanks to indicate that here is heat available, the rules now look like this:

Set PrimaryCirculator to TRUE if ZoneTstat1 is true and BoilerAquastat is true

Set PrimaryCirculator to TRUE if ZoneTstat1 is true and StorageAquastat is true

Set PrimaryCirculator to TRUE if ZoneTstat2 is true and BoilerAquastat is true

Set PrimaryCirculator to TRUE if ZoneTstat2 is true and StorageAquastat is true

Set PrimaryCirculator to TRUE if ZoneTstat3 is true and BoilerAquastat is true

Set PrimaryCirculator to TRUE if ZoneTstat3 is true and StorageAquastat is true

While this achieves the desired results, it's is now starting to feel cumbersome and difficult to understand. It only gets worse as additional rules and conditions are added. A better approach is to use two discrete outputs to carry system state information. The first will be true if there's any demand, and the second will be true if heat is available from storage or the wood boiler. Here's the resulting rule set:

Set Demand to TRUE if ZoneTstat1 is true

Set Demand to TRUE if ZoneTstat2 is true

Set Demand to TRUE if ZoneTstat3 is true

Set HeatAvailable to TRUE if BoilerAquastat is true

Set HeatAvailable to TRUE if StorageAquastat is true

Set PrimaryCirculator to TRUE if ~Demand is true and ~HeatAvailable is true

As an added bonus, we can get a visual indication of these states if we use a discrete output that's connected to an LED. This example uses state variables, but we could also use LED1 and LED2 on the controller front panel and rename them to 'Demand' and 'HeatAvailable'.

Rule Programming | Vermont Energy Control Systems

Vermont Energy Control Systems

Practical monitoring and control for the real world

Backup

As with any data on a computer, it's prudent to back up the rules and configuration data from the Vesta. All configuration and rule data is stored in text files that can be copied and saved either internally or on another computer. There are three ways to back up data, and two ways to restore from backup.

Fast and Simple

Backup

In the Vesta web interface, go to the 'System' tab. To back up all configuration and rule settings, Put a name in the 'Backup' field and click the 'Backup' button. Names must not contain spaces, punctuation, or special characters with the exception of '-' and '_'. A descriptive name is good, perhaps including a date. Backed up configurations appear as choices in the 'Restore' section.

All configurations saved in this way are saved to internal storage in the Vesta controller. This means that if there was a catastrophic failure of the CPU card, the configuration and backups could be lost.

Restore

To restore, simply click the 'Restore' button next to the saved configuration that you want to restore. NOTE: it may be necessary to cycle power on the Vesta controller after a Restore operation.

Note that restoring a saved configuration wipes out all current settings.

As delivered, the Vesta controller has three saved configurations:

  1. empty - As described, it's a completely empty configuration with no defined elements and no rules.
  2. full-test - This configuration is used before delivery to test the Vesta controller. All physical inputs and outputs have elements defined, and there are rules that exercise the system. This configuration is not likely to be of any use to end users.
  3. led-sample - This configuration is the 'as-delivered' setup. It has simple rules to illuminate the front panel LEDs based on the position of the user-defined front panel switch.

Web-Based Backup

It's possible to individually back up each configuration file to any computer that has access to the Vesta. In the Vesta web interface, go to the 'System' tab. All the configuration files are shown as clickable links. Right-click on each and save as a file on your computer.

Using FTP for Backup and Restore

A screenshot of the Command Prompt window

The Vesta controller is an FTP server, so FTP can be used to copy files to and from the Vesta. You can use any FTP client to do this, but there is a simple command-line FTP client that's included with Windows.

Before starting the backup process, create a directory on your computer for the Vesta files. In this example, there's a directory in 'My Documents' named 'Vesta'.

Bring up a command prompt window. One way is to click 'Start', then choose 'Run...', and in the popup type 'cmd'.

In the command prompt window type the following commands:

cd "My Documents\Vesta

(or the path to whatever directory you choose)

ftp 192.168.1.8

(substitute the address of your Vesta here)

When prompted, enter 'vesta' for the user name. Enter the password for your system, which is the same as your Vesta web password.

At the ftp prompt, type:

cd /usr/local/vesta/data

You can copy individual files from the Vesta controller to your computer by typing:

get filename

where filname is the name of the individual file that you want to copy.

You can copy all configuration files by typing:

mget *.csv

You can copy files from your computer to the Vesta by typing:

put filename

And finally, you can copy all configuration files (assuming that you have them on your computer) by typing:

mput *.csv

You can also back up, delete, or replace any configurations that were saved to internal storage. These are simply files in the /var/vesta/backups directory. They are tar files that have been compressed with gzip. If you are familiar with this approach, you can unpack and study the backups anywhere. Otherwise, simply store the files themselves as desired and copy them back to the Vesta controller if needed.

Other Files

In addition to the basic configuration files, the Vesta application makes use of files stored in several other locations. Some common directories include:

/var/www/private - password protected control panel (real-time GUI) files

/var/www/public - control panel (real-time GUI) files without password protection

/usr/local/vesta/etc - system configuration files

Rule Programming | Vermont Energy Control Systems

Vermont Energy Control Systems

Practical monitoring and control for the real world

User-Defined Tasks

Sample Task

Most situations can be handled using the rule engine that's provided with the Vesta. However, there could be situations where more complex logic is required. As an Open Source platform, the Vesta comes with complete source code and the ability to add custom code. This section describes the process of compiling a task that allows the Vesta to perform operations that can't easily be done using the standard rule engine.

Tasks are written in C++ and built on a standard template using library functions to access shared memory and other services. The source and Makefile for all Vesta tasks are in the /usr/local/vesta/bbb/src directory. This page documents the process of creating user-defined Vesta tasks using the ctlUsr1.cpp program that’s distributed with the system. We’ll go through the sample program section by section.

Well-Behaved Tasks

Vesta tasks are completely independent of each other - they only communicate through shared memory. All Vesta data - physical inputs and outputs as well as variables - are managed in shared memory as 'data elements', and most task activity is concerned with reading and writing data element values. In the Vesta system, there are a number of things a task must do to be 'well-behaved' - that is, to run smoothly and in harmony with other tasks.

  • A task needs to have a unique ID. The task ID is used with almost all shared memory API functions such as claiming write access to shared memory data elements. The ID values are defined in shm.h, and there are four reserved for user defined tasks - usr1_id, usr2_id, usr3_id, and usr4_id.
  • Using it's ID, a task must link to shared memory.
  • In most cases, tasks should claim the data elements that they will write values to.
  • Tasks must check for and respond appropriately to 'reload' requests. These generally indicate that there has been a configuration change that requires re-initializing.
  • Tasks run at a defined frequency, and must sleep to free up resources for other tasks. The ‘Settings’ tab provides a mechanism for setting task frequency.

The shared memory API provides functions to facilitate these task behaviors.

This example will be written to run as USR1, so its task ID will be usr1_id and it will run at an interval determined by the usr1_period value in shared memory.

Task Outline

All well-behaved tasks have the same basic structure:

Perform startup initialization (get shared memory link at a minimum)

Eternal Loop: { Perform reload (re-initialization) if instructed Read data from shared memory Do some computation Write results to shared memory Sleep until next cycle }

Task Support API

The system provides a set of functions that simplify writing a well behaved task. These functions handle interaction with shared memory as well as sleep management.

This sample task uses most of the task support API:

  • get_shm(taskid) - get link to shared memory
  • getNow() - get current timestamp
  • reloadRequired(taskid) - true if this task needs to reload data due to changes
  • clearReloadFlag(taskid) - clear reload flag for this task
  • claimElement(elementid,taskid) - claim write access to a shared memory data element
  • elementValue(elementid) - get value of data element from shared memory
  • setElement(elementid,value,diskflag) - set data element value in shared memory
  • timedSleep(processname,period,starttime) - sleep until next cycle is due

Sample Task Function

This task will perform the following functions:

  • Read two temperature values
  • Determine the difference
  • Find the higher of the two
  • Set one variable to the value of the difference
  • Set another variable equal to the higher of the two

Screenshot of control panel with sampleTask running:

Screenshot of sampleTask running

Sample Task Code

This section contains the complete code for sampleTask, with each section described in detail.

Includes and Defines

Like all C++ programs, you’ll need to include header files appropriate to the functions that you use. Additionally, you’ll need to include ‘shm.h’ and 'vestautils.h'.

#include <stdio.h>
#include <iostream>

#include "shm.h"
#include "vestautils.h"

// If you have struct or class definitions, put them in usr1.h and include here
//#include "usr1.h"

using namespace vesta;
using namespace std;


Variables

Like all C++ programs, a function named ‘main’ is required. In this case all of the code is in this single function. We’ll need a variable to keep track of timing - start_usec in this example. We also have variables to hold the temperatures from shared memory and the values that we’ll write to shared memory. The ID values for Vesta elements (Physical I/O and variables) can be obtained using the 'View' link under 'Elements Table' on the 'Settings' tab.

int main(){

  // Variable for calculating sleep interval
  unsigned long long start_usec;

  // We need element ID values for elements that we'll use.
  // Normally will get list from disk file. In this case we'll hard code.

  int temp1_id = 3;
  int temp2_id = 4;
  int diff_id = 109;
  int max_id = 113;

  // Variables to store shared memory values. Not necessary but can improve readability.
  float temp1, temp2, diff, max;

  // For error messages
  char logbuffer[80];
        

Initialization

There are four initializations that could be necessary:

  1. Establish shared memory link
  2. Initialize cycle timer
  3. Claim shared memory variables that this task will write to
  4. Read task-specific data from disk file(s)
The first two happen only once, when the program is first run. The second two could happen repeatedly, and are handled in the main loop.

Initializing shared memory and cycle timer:

  // ************ One - time initialization ************

  // Get shared memory link. This will create shared memory if necessary. Must pass valid ID:
  // usr1_id, usr2_ID, usr3_ID, or usr4_ID
  SHM shm(usr1_id);

  // Get start time for sleep calculations
  start_usec = getNow();


Controller tasks typically run forever with a timed sleep after each pass through the main loop.

  // Do forever
    while (1){
        

At the start of each cycle, check to see if there has been a change that requires us to refresh our shared memory or disk file data. For instance, the user could have changed element numbers. There’s a shared memory flag that we check to see if we need to re-initialize. This is always invoked the very first pass through. At the very least, we should claim the shared memory elements that we are going to write to. Claiming elements will generate warnings if other tasks have already claimed them, although it is legal for more than one process to write to the same element.

    // ************ As-needed reinitialization ************

    // Each cycle, check to see if we should respond to config changes in shared memory.
    // If we read a disk file, we should do that here too. Must use valid ID here as well
    if (shm.reloadRequired(usr1_id)){
      // Claim our elements (the ones we'll write to)
      shm.claimElement(diff_id,usr1_id);
      shm.claimElement(max_id,usr1_id);
      // Clear our bit in the reload flag
      shm.clearReloadFlag(usr1_id);
    }


Do the Work

Now that we’re through with any initialization, we need to do the actual task. Typically this involves reading some data from shared memory, performing some computation, and writing values back into shared memory. In this example, we’ll read two temperature values as ‘temp1’ and ‘temp2’. We’ll calculate the difference and determine the larger of the two temperatures.

    // ************ Read Shared Memory Values ************

    // Read values from shared memory using elementValue() function
    temp1 = shm.elementValue(temp1_id);
    temp2 = shm.elementValue(temp2_id);

    // ************ Perform Calculations ************
    // Calculate diff
    diff = temp1 - temp2;

    // Determine value for max
    if(temp1 > temp2){
      max = temp1;
    }else{
      max = temp2;
    }
        

Post the Results

Once the calculations are complete, the resulting values will be written back into two shared memory variables using the setElement() function. This function requires three arguments:

  1. The ID of the element to be written
  2. The value to be written
  3. A ‘disk write’ flag

The disk write flag tells the controller whether to update the elements.csv file on disk with the new value. Writing to disk means that the value will persist across system restarts. This would be appropriate for a user-defined variable such as ‘Top Floor Setpoint’, but would be pointless for this example. We’ll use a value of ‘0’ to indicate that the disk file does not need to be written.

    // ************ Write results to shared memory ************

    // Update shared memory with new values using setElement.
    // setElement needs element ID, value, and disk write flag. We don't need to save these values to disk.
    shm.setElement(diff_id, diff, 0);
    shm.setElement(max_id, max, 0);


Sleep

Once the work is done, we need to sleep until it’s time to run again. Our sleep interval is determined by a system configuration value - in this case, usr1_period which can be set on the controller’s ‘System’ tab.

    // ************ Sleep ************

    // Sleep until next cycle.
    shm.timedSleep(usr1_id, &start_usec);
Rule Programming | Vermont Energy Control Systems

Vermont Energy Control Systems

Practical monitoring and control for the real world

Software Architecture

A detailed knowledge of Vesta software architecture is NOT necessary in order to program and use the system, but it can be helpful to understand the basic components that make the Vesta controller work. If you want to jump immediately into creating rules, you can skip this section.

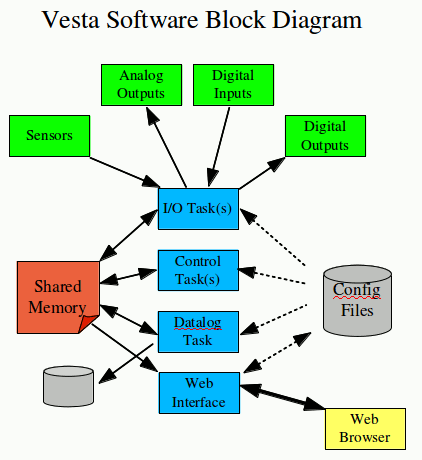
A Block Diagram representation of Vesta Software

The Vesta software makes use of shared memory and configuration files. There are several tasks which communicate via a block of shared memory. Each task can also read configuration files from disk as needed. Tasks are completely independent of each other and do not communicate except through shared memory.

For example, there is an I/O task which manages all of the physical inputs and outputs. It reads all of the sensors and discrete inputs and puts their values into shared memory. It reads values for discrete outputs from shared memory and sets the physical outputs accordingly.

In order to do this, it reads data from configuration files to determine what types of sensors are connected and what calibration values should be applied to the raw sensor signals.

This task does not depend on any other task. It doesn't know about rules or datalogging or anything else. You as a programmer cannot communicate directly with this task. Your interaction is entirely through the web interface, which allows you to change the contents of the configuration files.

In the same way, the control task(s) don't have any direct interaction with the physical hardware. They read the rules from configuration files, and read and write values to shared memory.

Configuration Files

All system behavior is determined by configuration files. The configuration files are simple comma separated value (csv) files that can be downloaded into a spreadsheet. In fact, you could configure and program the Vesta system by simply editing the configuration files with a spreadsheet or text editor. You can see the contents of any configuration file by clicking on it on the 'System' tab of the Web Interface.

Control Task

In programming, we are concerned with defining the behavior of the 'control' task. That task reads several configuration files that contain rules. It then implements the logic defined by those rules based on values in shared memory, and sets specified shared memory values as a result.

Shared Memory

Shared memory contains four types of data:

  1. Values for physical inputs and outputs
  2. Variables that are used by the control task
  3. Flags that tell tasks to take specific actions
  4. Command and status data for individual tasks

Any task can read any data that it needs from shared memory. However, only a single task should write data to any specific shared memory location. There are some exceptions, but in general each value is 'owned' by a specific task that is responsible for writing data to it. For instance, the I/O task is responsible for writing sensor data into shared memory.

Rule Programming | Vermont Energy Control Systems

Vermont Energy Control Systems

Practical monitoring and control for the real world

Copyright Notice

This document is part of the Vesta Control System Software, Copyright Vermont Energy Control Systems LLC.

Vesta contains is free software: you can redistribute it and/or modify it under the terms of the GNU General Public License as published by the Free Software Foundation, either version 3 of the License, or any later version.

Vesta software is distributed in the hope that it will be useful, but WITHOUT ANY WARRANTY; without even the implied warranty of MERCHANTABILITY or FITNESS FOR A PARTICULAR PURPOSE. See the GNU General Public License for more details.

You should have received a copy of the GNU General Public License along with the Vesta system. If not, see gnu.org/licenses.